On this page:
About student update
As a district manager or school manager, use the Update feature to update or transfer large number of existing mySciLEARN students at one time. For example, at the end of the school year, you could use this feature to change the grade for all of the students at your school or district and transfer any students who will be attending new schools in the fall.
To update or transfer individual students, see Edit student information and Transfer students to another school.
Large schools or districts that use a student information system (SIS) can automate the entire student update process. See Automate the Update feature (advanced).
Access the Update feature
To access the Update feature, log in to mySciLEARN, click the Students tab to open the Students page, and click the Update/Import button at the top of the page. Just like the Import Students feature, the Update feature is available based on your staff role:
- District managers can always access this feature.
- School managers can access the feature when using the default permissions for their role.
- Instructors cannot see the Update/Import button and cannot access the feature.
Updating students from a file includes three steps.
Step 1 – Create a CSV update file
The first step in the update process is to create a CSV file that includes the student information you plan to update. A CSV file (sometimes called a comma-delimited file) uses commas to separate student information into columns and fields, and uses lines (rows) to separate each individual student. mySciLEARN uses a CSV file to identify and then update the information for students who already exist in our system.
For example, the following mySciLEARN student information—Student ID, Username, Password, First Name, Last Name, Date of Birth, Grade, School (organization ID)—would look like this in a CSV file. The first line is always the header:
STUDENT_ID,USERNAME,PASSWORD,FIRST_NAME,LAST_NAME,DOB,GRADE,SCHOOL_ID
1111,janedoe,lemon,Jane,Doe,12/21/2001,4,123456
1112,johndoe,orange,John,Doe,01/05/2002,4,123456
You can use mySciLEARN to export the student information in a CSV formatted file (easier), or you can use your own CSV file (advanced).
Export students in a CSV file
To simplify the update process, mySciLEARN lets you export student data in a CSV file that meets our update requirements. This is the easiest way to update your students. However, if you already have your own CSV file, you can use that file instead—see Use your own CSV file to learn more.
- Log in to mySciLEARN as a district manager or school manager and in the Manage section, click the Students tab to access the Students page.
- Click the Update/Import button at the top of the page. If you cannot see the Update/Import button, you do not have permission to access this feature.
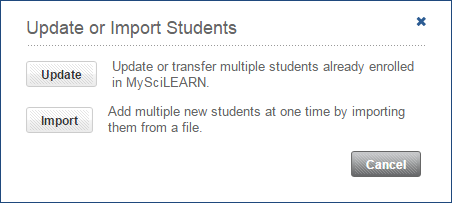
- On the Update or Import Students screen, click the Update button.
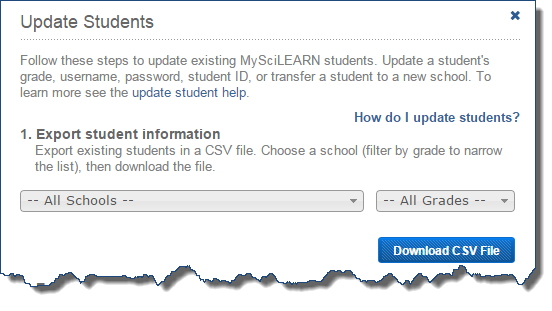
- On the Update Students screen, use the default filter settings to include students from all of your schools in all grades, or filter the students as needed:
- All Schools. Filter the students to be exported by school. School managers can only export students from their schools.
- All Grades. Filter the students to be exported by grade, based on which school you've chosen in the All Schools filter. Only the grades at the selected schools will appear in the filter.
- Click Download CSV File.
Note: For security reasons, student passwords are not included in the exported file.
If your browser asks you to choose between opening and saving the file, choose to save the file. If you choose to open the file, it may not be generated properly and will require that you generate the CSV file again.
Advance to Step 2 – Edit and format the CSV file.
Use your own CSV file
As an alternative to using our exported CSV file, you can create and use your own CSV file to update students. For example, many districts and schools use student information systems that allow you to export student data in a CSV formatted file. See your SIS documentation for steps. Also, if you’ve already created a CSV file to import new students, you can use that file as a starting point to update those students.
When using your own CSV file, you'll need to edit the file to conform to our expected format. You'll also need to add a header line to your CSV file that includes the correct mySciLEARN header names. The following example includes all of the header names you can include in the update file. To learn more about formatting requirements see Step 2 – Edit and format the CSV file.
STUDENT_ID,USERNAME,PASSWORD,FIRST_NAME,MIDDLE_INITIAL,LAST_NAME,DOB,GRADE,SCHOOL_ID,GROUP,INSTRUCTOR
Step 2 – Edit and format the CSV file
After creating a CSV update file, you'll need to edit that file to change your student information. Use a spreadsheet program such as Microsoft® Excel (save the file in CSV format) or a text editor software program such as Microsoft® Notepad or Apple’s TextEdit. Follow these requirements.
- Use a separate line (row) for each student. Only include students who already exist in mySciLEARN.
- Only include the 12 columns listed in under "Header name" the table. You can use fewer, but additional columns are not allowed. If you're using an import file, you'll need to remove any extra columns.
- If you're creating your own CSV file, make sure the file includes a header line at the top of the file, with header names that conform to the required format.
- Make sure the information in each field conforms to the required format and does not include invalid or extra information (such as a school that does not exist).
- Unless otherwise indicated, only use the following characters in the file: alphanumeric, spacebar, minus sign (as a hyphen), underscore.
- When using Excel to edit your CSV file, set any columns that include only numbers to "Text" format. This way, when you save the file, Excel will not remove any leading zeros from the numbers in those columns.
- If your district is very large, update students in groups of 10,000 or fewer. Note: Automated updates do not have this restriction; see Automate the Update feature (advanced).
- Empty or blank fields are skipped, and the information in mySciLEARN is not changed.
Update file format
|
Header name |
Description and requirements |
Update functionality |
|---|---|---|
|
|
A unique alphanumeric ID created by mySciLEARN to identify the student within the system. |
You can only access a student's Learner ID by exporting a CSV file from mySciLEARN (see Export students in a CSV file). This value is read only. A student's Learner ID cannot be changed. |
|
|
An ID assigned to the student by school staff. Must be unique across the district. |
If already added to mySciLEARN, Student ID is used to identify a student when the Learner ID is not in the CSV file. To update this value, include the student's Learner ID in the CSV file. |
|
|
The username for logging in to mySciLEARN. Must be unique across the district. |
Used to identify a student when the Learner ID and existing Student ID are not in the CSV file. To update this value, include the student's Learner ID or existing Student ID in the CSV file. |
|
|
The password for logging in to mySciLEARN. 5 to 25 characters only (not case sensitive). |
Can be updated as needed. For security reasons, student passwords are not included in the exported file. |
|
|
Minimum 2 characters. |
Along with Middle Initial / Last Name / Date of Birth, used to identify a student when the Learner ID, existing Student ID, and Username are not included in the CSV file. This value is read only. |
|
|
One character only. |
Along with First Name / Last Name / Date of Birth, used to identify a student when the Learner ID, existing Student ID, and Username are not included in the CSV file. This value is read only. |
|
|
Minimum 2 characters. |
Along with First Name / Middle Initial / Date of Birth, used to identify a student when the Learner ID, existing Student ID, and Username are not included in the CSV file. This value is read only. |
|
|
Date of birth:
|
Along with First Name / Middle Initial / Last Name, used to identify a student when the Learner ID, existing Student ID, and Username are not included in the CSV file. This value is read only. |
|
|
|
Can be updated as needed. |
|
|
The organization ID for the student's school (listed on the Schools page in mySciLEARN). To use this field, you must have access to the school. |
Can be used to transfer a student to another school. With per student licenses, the school must have an available license for the student or that student will not be transferred or updated. |
|
|
An existing group in which you want to enroll the student. If a name includes a comma or an ampersand (&), precede that character with a backslash (\). Example: 1st \& 2nd Period Lab. For multiple groups, use an ampersand (&) with no spaces or backslashes to separate them. Example: Fall 2010&After school. |
Can be updated as needed. When updated, students will be removed from any groups not included in this field. |
|
|
An existing instructor that you want to associate with the student.
If a name includes a comma or an ampersand (&), precede that character with a backslash (\). Example: John Doe\, Jr. For multiple instructors, use an ampersand (&) with no spaces or backslashes to separate them. Example: Jane Doe&John Doe. |
Can be updated as needed. When updated, associations will be removed for any instructors not included in this field. |
Step 3 – Upload the CSV file to update students
Upload the CSV update file you created in the first two steps.
- Log in to mySciLEARN as a district manager or school manager and in the Manage section, click the Students tab to access the Students page.
- Click the Update/Import button at the top of the page. If you cannot see the Update/Import button, you do not have permission to access this feature.
- On the Update or Import Students screen, click the Update button.
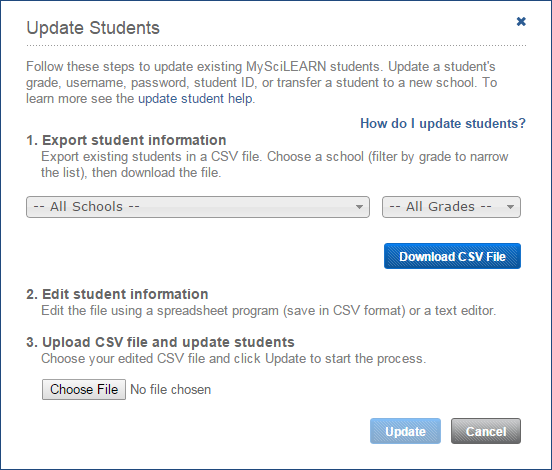
- Under Step 3 on the Update Students screen, click Choose File (or Browse, depending on your web browser), navigate to your CSV update file, then select it.
- Click Update to start the update process.
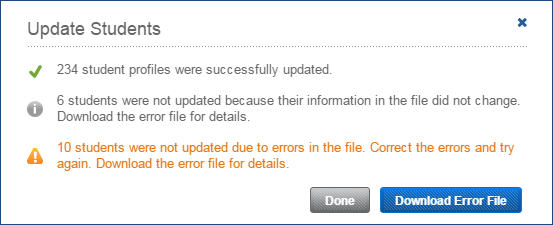
- If your file does not include any errors, all of the students in the file are updated in the system.
- If your file includes student rows with errors, those students are skipped during the update process. Click Download Error File to see a comprehensive list of errors. If needed, you can save that error list as a text file on your desktop, or copy and paste the error list into a text file. Correct the errors and try again.
- Click Done to end the process.
A message appears when the update is complete. If you are updating large numbers of students, this may take a few moments.